How to Make a Budget in Excel: Our Simple Step-by-Step Guide

This article may contain references to some of our advertising partners. Should you click on these links, we may be compensated. For more about our advertising policies, read our full disclosure statement here.
Making a budget in Excel can seem like a daunting task, especially if you don’t use the program regularly. Thankfully, you don’t need to be an accountant to set up an Excel budget template.
Whether your budget is super simple or extremely complex, this step-by-step guide will teach you how to create a budget in Excel that can quickly be customized to meet your family’s budgeting needs. Here’s how to start building your very own budget spreadsheet right away!
How to Make a Budget in Excel Using Premade Templates
Let’s face it: The COVID-19 pandemic has turned into a financial nightmare for many of us. With many people losing jobs and others taking a big hit to their monthly income, creating a solid budget has never been more important.
Using technology can be a huge help. These days, there are dozens of budgeting apps and software programs on the market. However, finding a program that fits your unique needs can be challenging.
Enter Excel. The Microsoft program has long been an excellent way to create a budget spreadsheet. Best of all, if you’re already a Microsoft customer, it won’t cost you an arm and a leg to get started.
The easiest and fastest way to build an Excel budget is by using the library of premade budget templates included in Excel. If you aren’t sure where to begin, I strongly suggest starting with one of the software’s budget templates to get a feel for what you might want to include in your own budget.
When you open up the program, simply go to File>New, then search for the term “budget.” Several Excel budget templates will pop up, such as a family budget, personal expense calculator, vacation budget, and more.

For example, if I went with the family budget spreadsheet, I would get a premade spreadsheet with a Cash Flow chart on the first tab. You can change your family name and budget title in this tab, but don’t mess with anything that has a formula. If you click on the “7,200,” you will see “=Income[[#Totals],[Projected]]” pop up next to the fx input box. Play with the formulas and you will mess with the automatic calculations that make Excel such a breeze to use.
Instead, you will find places to input your data on the other two tabs – Monthly Income and Monthly Expense. These numbers automatically feed information to the Cash Flow tab to keep track of how much you are earning and spending.

Customizing a Premade Template
If you’d like to add to the existing template, simply select where you want to add a box and right click. Scroll down to “Insert” and choose to add either “Table Columns to the Left” or “Table Rows Above.” This should automatically sync the new information with the existing tabs. If it doesn’t, select the small down arrow next to the “Projected” column, and you will be able to include your new column to the calculations.

You can also delete sections you don’t need. For example, if you don’t need the loans row in your Monthly Expenses tab, simply right click the tab, select “Delete” and “Table Rows.”
It’s really as simple as that!
How to Make a Budget in Excel from Scratch
Need to customize your budget even more? You can also create an Excel budget spreadsheet from the ground up! Here’s how to make a budget in Excel from scratch, including some of my favorite tips and tricks for customizing your new budget.
Step 1: Open a Blank Workbook
Your goal here is to create a zero-based budget where you account for every dollar you spend and earn. It’s a great way to keep track of your money because it is so darn accurate. Honestly, once you start using this type of budget, I don’t think you’ll ever use a different style of budget again.
Start by opening Excel and choosing “Blank Workbook” or go to File>New>Blank Workbook. Now you have a fresh canvas to start with.

Step 2: Set Up Your Income Tab
Once you have a blank workbook, block off a chunk of columns to use as a heading for the month. To do this, select the first two rows in columns A-G and select “Merge and Center” from the workbook’s “Home” menu. That will make the whole section now A1, and you can label it as you desire.
Next, select cells A3-A11, choose “Merge and Center,” and write and center the word “Income.” If you want to get creative, feel free to choose different fonts and colors.
Then, merge cells B3 & C3 and label them as “Source” to represent where your income is generated – i.e. your main paycheck, your side gig, etc. You’ll also want to merge each row of B&C individually through row 11.
See Also: Best Mint Alternatives – Our Top Picks This Year
Label cell D3 as “Date” to help keep track of when this payment came in. Adding a date section is optional and helpful if your income sources are varied each month. It may not be useful if your paychecks are predictable.
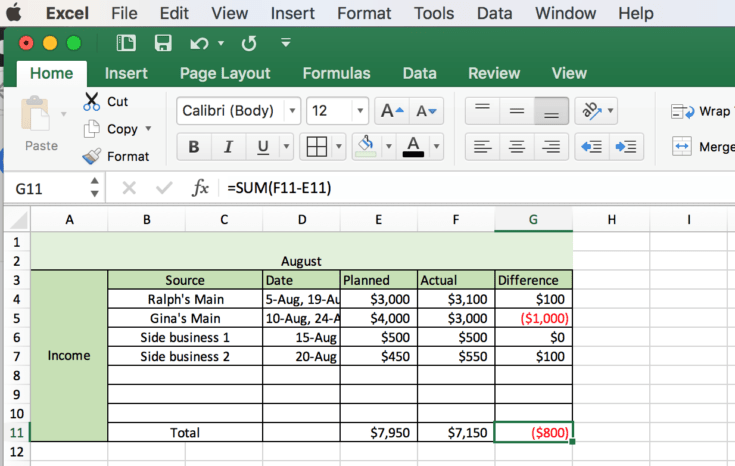
Next, label section E3 as “Planned” or “Budgeted.” This is the amount of income that you’re planning on coming in. Section F3 is your “Actual” column, and this represents the actual amount of money that hits the bank account – hopefully more than you planned for. Finally, a “Difference” column in G3 will automatically keep track of the difference between your planned and actual income.

Step 3: Add Formulas to Automate
To make your Excel budget look a little cleaner, select the entire section. Then, use the borders tool on the workbook’s “Home” tab (looks like a square divided into four) and choose “All Borders.” To make it even easier to read, you can also shade a few areas.
Once you like the look of your budget spreadsheet, it’s time to add the formulas that will automatically calculate everything for you. In the example below, I added “Total” to the B11 cell. However, you can add it at the bottom of however many sources of income you want to track.
After you have your “Total” label, select everything in the “Planned” column and use the “AutoSum” feature to get your total for the month. Alternatively, you can also select the last line in that column and input the formula “=SUM(E4:E10)”. Of course, you’ll want to replace the E4 and E10 designations with the range of cells you want to add together. Repeat this process for your “Actual” and “Difference” column.
To automatically calculate the difference between your “Planned” and “Actual” income, input the formula “=SUM(F4-E4)” after each row. Again, replace the F4 and E4 with the cells corresponding to your “Actual” and “Planned” sections. Repeat this for each row of income.
Step 4: Add Your Expenses
Once your income section is figured out, it’s time to calculate your expenses. You can either do this on the same sheet or start a new sheet. To keep expenses on the same sheet, create a new area underneath the “Income” section and customize it how you like. Then, use the same column headings – Due Date, Planned, Actual, and Difference – as you did earlier.
Create the formulas the same as you did earlier, with one major exception. In the “Difference” column, rather than using the “=SUM(Actual Number-Planned Number)” formula, you’ll need to switch it around. For calculating your expenses, you want to use the formula, “=SUM(Planned Number-Actual Number)” to calculate how much you overspent.
If you’d rather list your expenses on a separate sheet, just click the + sign at the bottom by “Sheet 1.” You can then rename each sheet by right clicking and selecting “Rename.”
When listing your expenses, you can customize the categories to your liking. Make it as specific or vague as you want. The key is to make tracking your regular spending easy. Some people might want to track their natural gas, trash, and electric separately while others may want to lump it together as “utilities.” It’s totally up to you!

Step 5: Add More Sections
Now it is starting to get fun! Add as many sections or sheets to your Excel budget as you want. In the example, I added a “Funds” and “Savings” section. You may notice that I removed the “Difference” column from these sections since we aren’t concerned about over-saving. If you’d like to see how much extra you saved than what you planned for, feel free to leave them in.

Step 6.0: The Final Balance
Once you’ve created all of the sections you want to track, it’s important to always know your running balance. Thankfully, you can leave your calculator buried in your drawer and track it automatically in Excel.
If you’re keeping everything on one sheet, this is super easy. Simply create another section at the bottom of the sheet. Then, label one row “Total Spending” and another “Final Balance.” This is an easy way to help you track your spending so you can compare your planned totals to your actual totals.
To calculate the total planned budget, input the formula “=SUM(Planned Expenses Total, Planned Funds Total, Planned Savings Total)”. Then, to calculate your planned balance use the formula “=SUM(Total Planned Spending – Total Planned Income)”. Do the same for the actual spending and balance sections but instead use the actual totals.
Remember, for the final balance you must do the total spent minus the total income to get an accurate total.
In my fictional example below, the budget is over by $115. Because we’ve made our budget using a spreadsheet, it’s super easy to see where the family overspent and under earned. And that’s the whole point – to make tracking your money as easy as possible so you know where each dollar is being spent.

Step 6.1: Totaling Numbers from Other Sheets
If you created separate sheets for your spending, savings, and other funds, choose which sheet you want to put the total on. You can either add the total to the first sheet or create a new sheet just for the total balances.

For the example above, I labeled my sheets and added a new total sheet at the very end. The total sheet will calculate the total planned spending and planned final balance, as well as the totals for the actual spending and final balance.
To calculate the totals from different sheets, click on the cell you want the total to appear and input the formula “=SUM(SheetName!Cell,SheetName!Cell,SheetName!Cell)”. In the example, this formula would be “=SUM(Expenses!E24,Funds!D6,Savings!D5)”. Repeat this for your planned total and your actual total.
To calculate the difference between your income and total spending, select the cell where you want the balance to display. Then, input the formula “=SUM(SheetName!Cell-Spending Cell)”. In the example, this is “=SUM(Income!F11-D2)”. This cell will show a negative number if you spent more than your earned.
Step 7: Insert a Graph (Optional)
Using a graph on your spreadsheet budget is optional, but it can help you better visualize how much you are spending. To create a pie chart or bar graph that displays your spending, you first need to create a column for percentages.

As you can see by the example, I just added another column. To total percentages automatically, the formula is “=Category Total Cell/Actual Total Cell”. In our example, the formula would read “=F2/F24”.
Input this formula for each category you want displayed as a percentage. To get the numbers to display as a percentage rather than a decimal, highlight the column and select the “%” to quickly change it to percentages. Your total percentage should add up to 100 percent.

Next, highlight the category column and the percentage column simultaneously. Once both are highlighted, go to “Insert” and choose which type of graph you want. If you don’t like the style you chose, you can always change it afterwards by right clicking your graph and selecting “Change Chart Type.”
The graph displayed below is a donut chart, and I like how it neatly breaks down spending categories.

Creating a Budget Spreadsheet: Helpful Hints
You can save your Excel budget spreadsheet as a template to use every month. If you kept your income, expenses, savings, etc. on one sheet, you can also copy all of the boxes and paste them on a new sheet. Simply rename that sheet for a different month. This is a great way to save an entire year’s worth of spending in one Excel workbook. At the end of the year, you can then create a new formula to add up your yearly savings, spending, and earnings.
Excel can automatically do the math for you. I covered addition and subtraction, but here are the formulas for multiplication and division too:
- Multiplication: In the desired cell, type “=” followed by the cell for a number you want to multiply. Then, type “*” and end with the cell for the other number you want to multiply. Finally, hit enter. For example, “=F5*H50”.
- Division: In the desired cell, type “=” followed by the cell for a number you want to divide. Then, type “/”, and end with the cell for the other number you want to divide by. Finally, hit enter. For example, “=E15/A10”.
Let’s say you want the bottom row to add all the sums. Rather than type the formula in each cell, you can speed up the process by dragging the same formula across an entire row. To do this, enter the formula into one cell, click the cell after the total appears, and drag the green box across the area you want that formula to be applied. It’s as simple as that.
What If You Don’t Have Excel?
If you love the idea of using a budget spreadsheet but your computer doesn’t come with Excel, don’t worry. Google offers a free version spreadsheet program called Sheets. The two programs look and work similarly. Plus, Google Sheets works (almost) seamlessly with Excel, meaning you can easily import an Excel budget template you created into Sheets.
Make Excel Your Own
Although this guide explained how to make a budget in Excel, you’re definitely not limited to what I showed you here. Excel is highly customizable, and you can create a sheet to fit any area of your finances. Don’t be afraid to create a whole new budget spreadsheet for tracking your vacation budget, holiday spending, debt repayment, and more.
Excel can be a crucial tool to transform your spending habits, so play around with it until you’re comfortable. Once you get it set up, the automatic formulas in an Excel budget template can even trump a pen and paper for budget – at least in terms of convenience. Just enter the info correctly, and everything will populate automatically for you. Plus, you can easily view several months (or years) of budgeting data with just a few clicks.
Here’s the best part: You never need to learn more than what is in this guide if you don’t want to. Sticking with a simple Excel budget template can work wonders for your money management, so don’t feel like you have to become an Excel genius. If you never learn the other functions and options in Excel but simply follow these steps, you’ll be just fine.
Still not sure how to get started budgeting? Our complete budgeting guide walks you through estimating your income, determining monthly expenses, and how to reach a zero-based budget. Check it out using the link above.
I hope this guide to creating a budget in Excel has been helpful. Thanks so much for reading, and good luck!
![]()
Have you created your own budgeting spreadsheet in Excel? Let us know how it went in the comments below!


This is great! followed it step by step. hopefully now I can stay on target.
Can you import from bank?
This was super helpful! I just outlined my budget for the rest of the year with this!
Awesome! Glad it helped 🙂
Your website is great, but I’m looking for a way to export my B of A data into an Excel spreadsheet instead of me retyping each exp/income every time I have a transaction. Thanks in advance if you have any ideas
‘To calculate the total planned budget, input the formula “=SUM(Planned Expenses Total, Planned Funds Total, Planned Savings Total)”. Then, to calculate your planned balance use the formula “=SUM(Total Planned Spending – Total Planned Income)”. Do the same for the actual spending and balance sections but instead use the actual totals.’
This is very unclear: Where are these entered? In the ‘Total spending’ column or ‘Final balance’ column? And what if you do not have funds or savings, just the regular expenses? How to calculate the total balance?
This is amazing! I had tried this step by step and able to make a monthly budget plan. This helps me in managing my finances. Now no tension and worries. It make my work easier.
Great post! I’m really struggling to manage my finances and this guide has taught me so much. I can’t wait to try it out and see the difference it makes in my life. Thanks for sharing!