My Frugal Bathroom Cabinet Remodel

This article may contain references to some of our advertising partners. Should you click on these links, we may be compensated. For more about our advertising policies, read our full disclosure statement here.
In January of this year, we bought what I assume will be our forever home. But the house isn’t perfect, so we’ve spent the last month or so doing all kinds of things to make it nicer. For instance, we had all of the old ratty carpet replaced with new. We put tile flooring into the office. We got new countertops in our kitchen, and subsequently had to put in a new tile backsplash to hide the wall damage we did when we took out the old cracked, countertops. We also painted the entire house….which made such a huge difference.
Now that that’s all done with, the house is pretty nice and way nicer than our old home. Still, I love to nitpick and I enjoy making things nicer than they once were, on a budget of course. So I decided that I would put a little effort into our bathroom cabinets, both in our kid’s bathroom and in the master. Here’s what we started with:
As you can see, the cabinets in our guest bathroom started in pretty good shape:

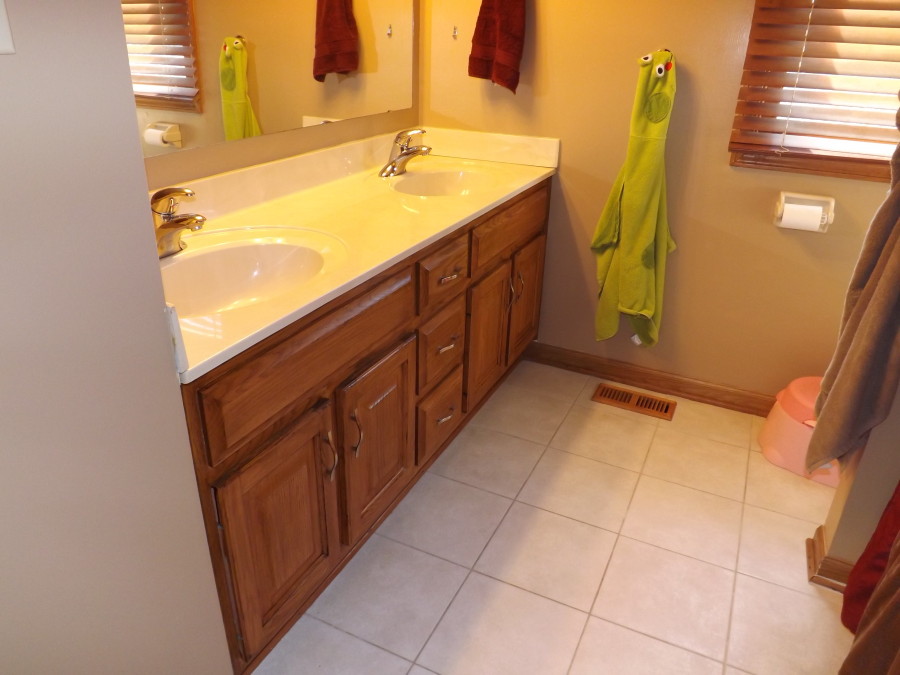
Here’s how our master bathroom started out:

Of course, they didn’t look bad from a distance at all. However, when you looked up close, the cabinets in both bathrooms were actually quite worn:

 Even though the cabinets were fairly beat up, we obviously didn’t want to replace them altogether. First of all, the bones were in great shape. Second of all, we all know that that would be a huge pain in the ass. Third of all, that would be stupid. So instead, we decided to sand and re-stain them ourselves.
 Because we’re lazy, we decided to use Minwax Polyshades, which combines an oil-based wood stain and polyurethane in one simple step. Here’s how we did it:
How to Use Minwax Polyshades
Minwax Polyshades is so easy that my four-year-old could daughter do it. Seriously. She did. Look.
First, we unscrewed the cabinet pulls and removed them. Then we started the process by lightly sanding all of the cabinets, drawer fronts, and doors. The following pictures show our bathroom cabinets in various stages of the sanding process:


The next thing we needed to do was use the vacuum hose to suck up all of dirt and dust, and we saved a ton of cash by hiring our four-year-old daughter to do some of the grunt work. And why not? She works really hard, always has a positive attitude, and accepts payment in gummy bears, stickers, or Ben & Jerry’s ice cream.

Once we had all the dirt and dust sucked up, we were ready to start staining. The supplies we used for this job include latex gloves and a few pairs of holey socks that were already headed for the trash.


I managed to get the stain on both cabinets by slowly working my way from one side to the other with one of Greg’s old, crusty socks. Since Minwax Polyshades is known to smudge, I took special care spread it evenly and clean up any smudges before they dried. Here are a few pictures that I took during the process:


Once I was done staining the cabinets, I waited for a while to see if we should put on a second coat. Ultimately, we decided that we were happy with the color and coverage and didn’t want to push our luck. Plus, did I mention that we’re lazy? Here are some pictures of the cabinets once the entire process was over with. Voila!
 As you can see, the cabinets don’t look all that much different. However, they do look about a million times better than they did before. All of the worn spots and imperfections are now completely hidden by the new stain, and both vanities look practically new when you see them up close. Overall, we’re very happy with our frugal bathroom cabinet remodel, especially when you consider what we spent on it:

Total Cost of our Frugal Bathroom Cabinet Remodel:
- Minwax Polyshades: $13.46
- 4 Pairs of Greg’s old socks: Ummmm……$1?
- My arms hurt: $0
Sweet.
Have you ever sanded and re-stained a bathroom cabinet, kitchen cabinet, or piece of furniture? What kind of frugal remodel have you done lately?


I’m pretty sure the department of labor frowns upon making your young cute child do staining or any remodeling of a bathroom 🙂
LOL – The cabinets look great! We actually just redid two of our bathrooms completely as well. It’s funny what a little paint and stain can do to brighten things up.
She wanted to help, I swear! My two-year-old helped too, but only for a few minutes. She’s easily distracted =)
Awesome! Love the socks idea. And they look great in the pics! All for less than $15- you really can’t beat that!
Yeah, and I only used about 1/3 of the stain. I wish I would’ve bought the smaller container =/
Nice job. It’s amazing what a little elbow grease can do for a lot of things.
I haven’t done any frugal renovations lately, but I have one on my list. I’ve had my white French Provençal dresser since I was about the size of your daughter in those pictures. It’s very juvenile, but it’s solid wood with awesome construction. I am planning on painting it when it gets nicer outside. Hopefully it doesn’t prove too difficult.
Sounds like a great project!
That’s why you hold on to those old socks. They work great for staining. The cabinets look incredible…nicely done!
Yeah, I knew my husband’s old socks would come in handy for something!
I love that you got your daughter to help! This isn’t something I’ve done before but it definitely looks achievable. That master bathroom looks great by the way! Hope you guys are enjoying it all so far.
We are. Thanks!
Wow, Holly, they turned out SO nice!!! Great job. We will definitely be doing this next go-around with our cabinets. Yours look brand new now!
They really do. And the insides are really clean and well cared-for so it really is like having new cabinets!
This was clearly a very frugal DIY project and I enjoyed seeing how the whole family got together to completely change the look of those cabinets. Sorry about your aching arm and ‘lol’ at the free labor your daughter put in.
I’ll survive!
That’s awesome Holly! We’ve been in the middle of getting our master bath redone – we traded services with a friend…we designed a new site for him and we got a new bathroom. Anyway, our cabinets look basically like your before and have been wanting to improve them without spending a huge amount of money. I think I found what we’ll be doing. Good thing our 4 & 6 year old accept similar bribes. 😉
Nice! Minwax Polyshades has a bunch of different stain colors! I used Mission Oak…it didn’t turn out as dark as it should have but we only did one coat.
Wow looks great Holly! I haven’t sanded or re-stained any of our furniture yet, but it’s something I want to do in our kitchen so that I can put off buying new cabinets/countertops/etc. for as long as possible.
We are doing our kitchen cabinets next….we wanted to experiment with the bathrooms first!
Glad you didn’t paint them white!
Yeah, I don’t think white would work in our house. All of the woodwork is medium-colored. Of course, if I ruined them by staining, painting them was my plan B!
Nice work! I’m getting ready to redo an old dresser if the weather ever warms up enough. It’ll be my first foray into furniture refinishing. Must be pretty easy to do if your 4 year old could handle it!
Looks great! We’re going to have a few projects like these around the house. My wife already did some work on the kitchen cabinets that way too. It’s a great feeling to DIY too.
My dad gave us this raw bed – head board, foot board etc – and we sanded it and painted it white. I am not a huge fan of wood grain unless it’s on a beam or something, because otherwise it clashes with my flooring haha. Anyway it was a ton of work!
First of all, I love all of the pics of the “child labor” during the frugal remodel, and it has given me a bunch of ideas for what my son can do. We bought a house that was 25 years old with horrific kitchen cabinets and countertops. We thought about refinishing them, but needed painting done more. So instead, I bought a box of Mr. Clean Magic Erasers for $3.00 and spent two days wiping the crap out of everything. And the kitchen actually looked 10 times better. One of these days we will get around to a more in-depth remodel but thanks to Mr. Clean, it is not mission critical anymore.
I bought a place with crappy old grungy cabinets too, but they still looked sad after cleaning- I used Bin primer to bloc wood grain from bleeding through amd then painted – it looks like a new kitchen 🙂
Hi Holly.
You all did such an amazing job and the end result looks great. Your little one looks she was actually having fun and she did a great job 🙂
If only all renovations could be this cheap and easy!
Take care and happy week ahead! All the best.
Lyle
Thanks Lyle!
And that is how you DIY! Simple project and not expensive. Nice work Holly, Greg, and your child laborer!
Haha! Hey, she volunteered!
Cabinets are ridiculously expensive. The fact that you found a way to “upgrade” for under $20 is pretty awesome.
Yep yep!
Haha I love how she helped, so cute! We painted the bathroom cabinet in our guest bathroom because it was really ugly looking. I think it was the first think we did in our house because it was so bad!
Sweet!
OMG! I loved Minwax. I’ve used the Mahogany and Red Oak ones in our house as well with good result. I nearly choked on my coffee when l read the pushing our luck bit. I stopped at 1 coat too. I didn’t want to push my luck either. Only mistake l did was using it on the deck as well! Looked great, but only lasted a couple of years.. I had to redo it with the outside stain one. Your cabinets look great, and l am your daughter had fun!
We really need to stain the deck at our new house. Now we just have to wait until it warms up =)
Look great! I live in an apt, so there are things I’d like to do, but don’t see the point since it wouldn’t benefit me in the long run.
I hear ya. I wouldn’t do too much either if we rented.
Looks great Holly. Nice way to save on cabinets.
Thank you!
Your daughter is so cute helping out! The end result is really good. I use kerosine and vegetable oil to polish the wood, it keeps insects away, and it is pretty cheap.
That sounds like a great idea!
We have some projects coming up. I’m pretty lazy too, but it’s always nice when it’s done, and you can’t beat the cost of DIY!
Nope, you can’t! I have limited skills but I can sand and stain!
That looks awesome Holly! We did the same thing with a bunch of cabinets in our kitchen when we bought them. Like you said, outside of some sore arms, it really didn’t cost more than a few dollars. Well done!
Thanks!
Nice! When you have real wood around the house it’s amazing how easily you can add new life to it. Laminate, sadly, can be a very different story which is why I’m excited to get rid of the laminate in our kitchen next year.
I don’t like laminate either =/
I love DIY projects and am hoping to get more into them this year.. I recently bought a bunch of picture frames from the thrift store to decorate my house. I will be painting those in the next few weeks. I think it’s cute you got your girls to help out too.
I need some new pictures frames. I bet yours will turn out great!
Great way to show that with a little elbow grease and an afternoon of work what you can do for little money. I was most interested to see what the going pay rate was for your daughter. I like her style. I’m going to see if I can get my wife to pay me in Dairy Queen Oreo Cookie Blizzards the next time she has a project in mind for the house!
She loves helping for free! =)
I think they came out great. Staining wood just makes it look brand new to me. I would have taken the same route.
Yep, it was a no-brainer!
I thought we were getting close to a plumber’s butt shot on one of those pics!
Looks like you have some great, high-paid help. 🙂
I already told her, “crack is whack.”
Nice work! The only thing that would concern me was whether the stain you used was either no- or low-VOC. Off-gassing can be quite dangerous is my understanding, and even if you use no or low VOC stain, I think you’re supposed to seal.
Check out the blog Young House Love and see their tips for staining to make sure you’re not breathing in dangerous fumes!
It is low VOC, but thanks for the tip!!!
Holly
Now I know why I need kids to help around the house. Bathroom looks great,; especially on a budget
Thanks!
Glad you were able to keep the cabinets. I see perfectly good cabinets trashed often on the curbs here in the city in fancy neighborhoods and it’s sad to see something that with a little TLC can be just as good, if not better, than the particle board cabinets of today.
I love that your daughter works for gummy bears and Ben and Jerry ice cream! The cabinets looks great, although I did originally think nothing was wrong. It’s true things from a distance don’t always look the same close-up. Paint makes a HUGE difference. We repainted parts of home last Spring and it’s really amazing what a fresh coat of a paint does. And changing cabinet hardware. We did that a few years back and it made a surprising difference in our kitchen.
That’s actually really amazing! I never believed that such results can be achieved at so low costs. Not to mention the fact that you had invaluable help and I am sure that your daughter is very proud now when she can look at how cool the cabinets are and she knows she contributed to it!
Great project, Holly, and the results are noticable. I like the window coverings, too!
I have to say I feel a lot better about the idea of DIY home projects if your 4 year old can do it – I think there might be a series in that ;o)
The cabinets look great but your little girl is SO CUTE! Gah can’t wait till my kids get here. 🙂
They look amazing! Very nice job, especially by your daughter! I love the color of the wood in the master bathroom. My boyfriend would love to get a house with real wood trim (he works with lumber and has become a little obsessed). Can’t wait to see how your kitchen cabinets turn out!
You might actually want to consider paying your child with real money. From what I remember it would be a write off and is tax free But now that I am thinking about it, it doesnt really deal with your business, so I am probably way off base
Looks great! And Little Holly is adorbs! Yes, I said adorbs. And she already knows a good deal! I would’ve totally helped out for some Ben & Jerry’s and stickers.
They look great. Almost makes me want to do a home improvement project (almost, I’m also lazy!)
Wow, your cabinets look great! Price can’t be beat. Good way to instill the DIY spirit in your daughter from such a young age, too 🙂
Nice style! I will also do that in my cabinet. Thanks for sharing your style.
Thank you for the article on renewing old worn cabinets. I will be doing this to our kitchen cabinets.